
Welcome To DWT Listing Theme

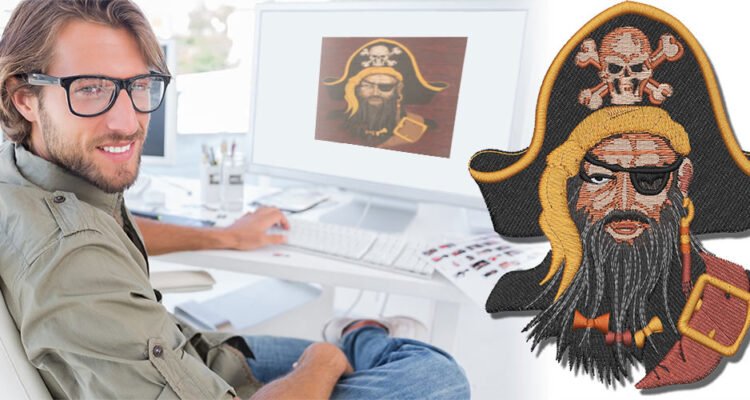
In today’s creative world, where fashion, branding, and personalization meet technology, converting digital artwork into embroidery files has become an exciting and essential process. Whether you are a small business owner trying to brand your merchandise, a hobbyist who loves adding flair to fabric, or a designer aiming to turn original digital art into embroidery masterpieces, understanding image to embroidery file conversion is a skill worth mastering.
So, how does one transform a flat image file into stitches that flow beautifully on fabric? Surprisingly, this is both an art and a science—a mix of creativity and precision—that requires not just an eye for design but also technical know-how. In this article, we will walk you through the journey of transforming digital art into stunning threadwork, explain why the process matters, and uncover some best practices that can make your embroidery projects shine.
Let’s begin by understanding what embroidery file conversion really means.
You might have an eye-catching logo, a hand-drawn sketch, or a cool graphic saved as a JPG, PNG, or SVG file. Unfortunately, embroidery machines cannot read these image formats directly. Instead, they need special file types called embroidery files—such as PES, DST, JEF, EXP, and HUS formats. These files tell the machine exactly how to stitch the design: where to start, where to end, how dense the stitches should be, which directions they should flow, and what kind of stitch to use.
In simple terms, converting an image to an embroidery file is like translating a language—the design gets rewritten in a form that your embroidery machine can understand and execute flawlessly.
Many people think converting an image to an embroidery file is as simple as clicking “Save As” in their design software. Unfortunately, it’s far more complex than that. The process involves digitizing, which is creating a blueprint of the design specifically for embroidery. It’s not automatic, and it cannot be done by just any photo editing tool.
The key challenge is that embroidery is a physical process involving threads, fabric textures, and needles. Unlike printing, embroidery must consider the movement of the fabric, thread tension, density, stitch type, and many other factors. What looks sharp on a screen could look messy or distorted on cloth if not digitized properly.
For example, small text in your image might need to be enlarged or thickened to stitch cleanly. Gradients and shading need to be adjusted with careful layering of stitches, and overlapping areas must be sequenced so that threads lay properly without puckering.
To convert an image to an embroidery file, you need embroidery digitizing software—not regular graphic design tools. Programs like Wilcom, Hatch, Brother PE-Design, Embrilliance, or SewArt are made specifically for this task.
Here’s what typically happens inside the digitizing software:
While some software offers “auto-digitize” options, manual digitizing always gives better, cleaner results—especially for logos, text, and detailed designs.
When digitizing an image for embroidery, you can’t ignore the fabric you’re going to use. Each fabric reacts differently to stitching. A design that looks great on thick denim might distort on stretchy cotton. Likewise, embroidery thread colors and types (rayon, polyester, metallic) change the final appearance.
For instance, for light fabrics like silk, you might reduce stitch density and use special underlay techniques to prevent puckering. On canvas or leather, you can increase density and use bold satin stitches for a luxurious look. All these considerations happen during the digitizing process to ensure your final stitched design matches your vision.
Not every image you find online or create in Photoshop is ready for embroidery conversion. Designs with complex gradients, shadows, or photographic elements usually require simplification to suit threadwork. Embroidery is better at handling solid shapes, bold lines, and clear color blocks.
If your image is a full-color photograph, it may need to be converted into a more graphic, flat design, possibly reducing colors and emphasizing outlines to stitch clearly. The goal is to maintain the essence of the image while adapting it to the embroidery medium.
A lot can go wrong during this process if you’re not careful. Here are some common mistakes to avoid:
There are plenty of free tools claiming to convert images into embroidery files automatically. While these can work for very basic designs, they often fall short when precision and quality are required. Automatic converters rarely consider fabric type, stitch type, or thread behavior, leading to poor stitching outcomes.
Professional digitizing services or expert manual digitizing using proper software deliver superior results. The design will stitch smoother, last longer, and look far more professional on garments or accessories.
If you’re running a business or making pieces for sale, investing in professional digitizing is strongly recommended. For casual home projects, learning to use basic digitizing software like SewArt might be sufficient.
Even the best-looking file preview isn’t a guarantee of perfection. Always run a test stitch on similar fabric before starting final production. Testing lets you spot problems like thread breaks, fabric puckering, or alignment issues and correct them early.
Pro tip: Use contrasting thread colors on the test run to see every detail clearly. After adjustments, test again until the results are perfect. This step ensures your converted image truly comes to life as threadwork.
The embroidery digitizing landscape keeps evolving with new software features, machine capabilities, and materials. Keeping yourself updated with trends, tools, and best practices can help you get the most out of your designs.
AI-powered auto-digitizing tools, cloud-based design libraries, and advanced multi-needle machines are just some innovations reshaping embroidery workflows. Even beginners now have easier access to resources that were once exclusive to industry pros.
Converting an image to an embroidery file bridges the gap between digital creativity and real-world craftsmanship. It requires more than just clicking a button—it demands understanding fabric behavior, choosing the right stitch types, adjusting density, and perfecting every detail so the embroidery machine stitches exactly as intended.
Whether you’re a hobbyist designing gifts, a small business customizing apparel, or an artist bringing digital masterpieces to life, mastering this process will set your work apart.
Take your time to learn digitizing software, respect the craft of embroidery, and—above all—test your files to ensure perfection. When done right, the magic of turning simple digital art into beautiful threadwork is worth every bit of effort.

Our business directory website helps you discover and connect with trusted local businesses and service providers. From shops and restaurants to professional services, find everything you need in one place. Browse categories, read reviews, and grow your business visibility with us.
Copyright © Created By Digital Mix, All Rights Reserved.